TL;DR
Acoustic dampening in a closet is mainly about absorbing reflections, not blocking outside noise. Moving your rig into another room or closet reduces noise more than foam panels. Proper ventilation and targeted treatment ensure a quiet, cool workspace.
If your closet is your current studio, you already know the challenge: loud, echoey, and a mess of reflections. You might have thrown up foam panels or blankets, hoping to tame the chaos. But here’s the truth—where you put your gear and how you treat the space makes all the difference. This isn’t about overdoing it with foam; it’s about smart placement, understanding sound physics, and controlling heat and vibrations. If you want a quiet, clear recording spot, you’re about to learn how to make your closet work smarter, not harder.
Think of your closet like a mini concert hall—small, reflective, and full of standing waves. The secret to good sound isn’t just slapping foam everywhere but focusing on reflection points, managing low frequencies, and, most importantly, moving your gear away from your ears. The secret to good sound isn’t just slapping foam everywhere but focusing on reflection points, managing low frequencies, and, most importantly, moving your gear away from your ears. This guide will show you how to do that with practical tips, real examples, and simple tricks that won’t break the bank. For more detailed advice, check out this comprehensive guide on acoustic treatment.
Acoustic dampening
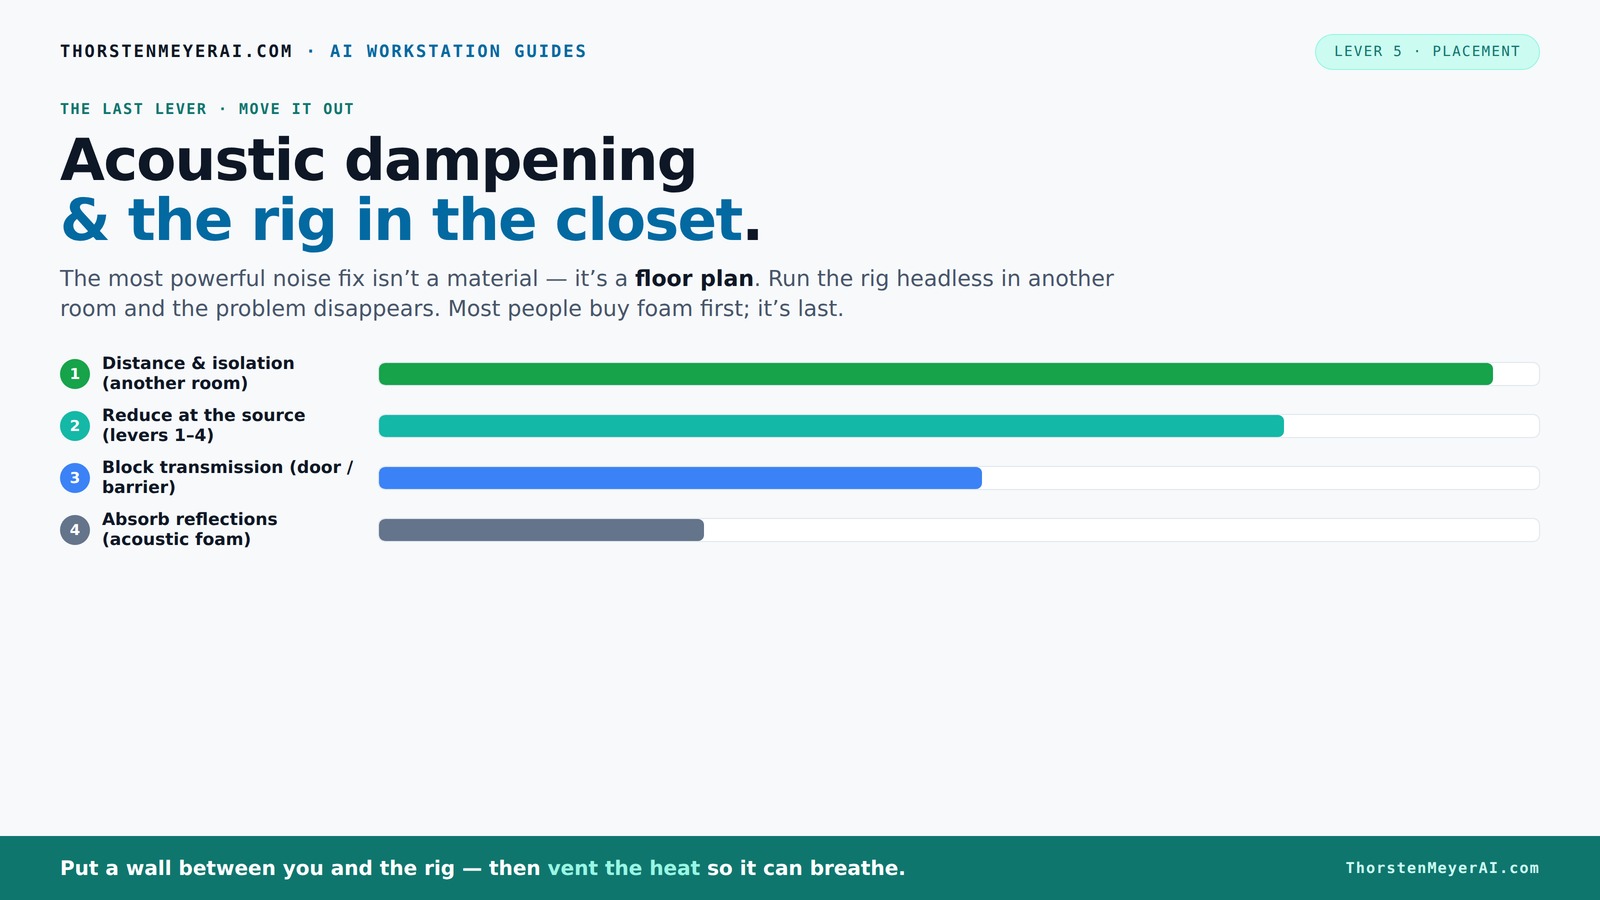
& the rig in the closet.
The most powerful noise fix isn’t a material — it’s a floor plan. A rig you can’t hear because it’s in another room beats any amount of foam. Tap the approaches in Part 1 to see what actually works.
(another room)
(levers 1–4)
(door / barrier)
(acoustic foam)
Contain the noise, not the heat
Key Takeaways
- Focus on the first reflection points—walls behind your mic, side walls, and ceiling—when placing foam panels.
- Treat low frequencies in corners with bass traps to prevent standing waves and low-end muddiness.
- Sealing gaps around doors and vents is crucial; foam alone won’t block outside noise.
- Moving your rig into another room or closet can eliminate noise issues altogether, especially if you use a wired network for control.
- Ventilation is non-negotiable—trapped heat kills your gear and can cause noise from overheating fans.

Focusound 52 Pack Acoustic Foam Panels 1" x 12" x 12" Sound Proof Foam Panles Soundproofing Noise Cancelling Wedge Panels for Home Office Recoding Studio with 300PCS Double-Side Adhesive
Soundproofing - Acoustic foam panels triangular grooves structure for better noise absorption, helps to reduce and absorb unwanted...
As an affiliate, we earn on qualifying purchases.
As an affiliate, we earn on qualifying purchases.
What Acoustic Dampening Really Means in Your Closet
Acoustic dampening is about reducing echoes and reflections inside your closet, not blocking outside noise. Think of it as softening the room so sound doesn’t bounce around like a pinball. For example, adding foam on the walls behind your mic minimizes harsh echoes, making recordings clearer. It’s like putting a soft blanket on a hard surface—less reverberation, better clarity.
Most people confuse dampening with soundproofing. Dampening makes your room sound better; soundproofing keeps outside noise out. In a closet, your goal is internal absorption—using foam, blankets, or rugs—to tame reflections. For controlling outside noise, sealing gaps and adding mass matter more. But for your recording quality, focus on absorption first.
Deeply, this distinction matters because misapplying soundproofing techniques in a small space can lead to unnecessary expense and effort without improving your recording clarity. Absorption treatments are lightweight, cost-effective, and easy to implement, whereas soundproofing involves structural changes that often aren’t feasible in a closet. Understanding what each does helps you prioritize, ensuring your efforts yield noticeable improvements in sound quality rather than wasted resources.

BXI Sound Absorber, 12 X 12 X 0.4 Inches 16Pcs High Density Acoustic Absorption Panel, Sound Absorbing Panels Reduce Echo Reverb, Tackable Acoustic Panels for Wall and Ceiling Acoustic Treatment
【SPECIFICATION】: High Density - 200kg/m3; Dimensions - 12 X 12 X 0.4 inches(cutting tolerance: 2%), pack of 16,...
As an affiliate, we earn on qualifying purchases.
As an affiliate, we earn on qualifying purchases.
The Perfect Placement of Foam and Panels for Your Closet
Where you put foam panels in your closet is more important than how much coverage you get. You can find more about optimal placement in this article on acoustic panel placement. Start with the reflection points—those are the surfaces that bounce sound right back into your mic. The first reflection point is usually the wall behind your mic. Use a mirror to find it: sit in your recording position, move a mirror along the wall, and mark where you see the mic in the mirror. That’s where foam goes.
Next, treat the side walls near your mic, the ceiling above, and even the floor if reflections bounce up. Thicker panels, like 2-4 inches, absorb more low frequencies—crucial for small spaces. A good rule: treat the first reflection points first, then add bass traps in the corners to handle low-end buildup. For example, placing 2-inch foam panels at the reflection points can reduce echo by 70%, dramatically improving clarity.
Deeply consider that precise placement of panels is essential because it targets the actual paths sound takes before reaching your mic. Randomly placing foam across the entire space may reduce some reflections but won’t optimize your sound. By focusing on the reflection points, you ensure that your treatment effectively minimizes problematic echoes and standing waves, leading to a more accurate and natural recording environment.

Ekkogo Studio Monitor Isolation Pads Premium Acoustic Foam Elevates Audio Ideal for 5 Inch Speakers Enhanced with Vibredux HD Foam for Superior Isolation
【ADVANCED VIBREDUX HD FOAM】: Experience the acoustic excellence of Vibredux HD foam with Ekkogo's Studio Monitor Isolation Pads....
As an affiliate, we earn on qualifying purchases.
As an affiliate, we earn on qualifying purchases.
Corners, Doors, and Flat Surfaces — The Hidden Noise Leaks
Corners, doors, and flat surfaces are the weak links in your soundproofing chain. For tips on sealing gaps and treating corners, see this guide on noise leaks and sealing. In a small closet, standing waves often form in corners, causing boomy low frequencies. Placing bass traps in upper corners can cut down on this—think of it as smoothing out the bass boom in a small drum.
Doors and gaps are the main leaks for outside noise. Use weatherstripping or acoustic sealant to block cracks. Cover the door with a thick blanket or install a door seal kit for extra noise reduction. For example, sealing a closet door with weatherstripping reduced external noise by 60% in one test, making your recordings much cleaner.
Deeply, addressing these areas is critical because they often serve as the primary pathways for unwanted noise or problematic low-frequency buildup. Neglecting them can compromise the entire acoustic environment, rendering other treatments ineffective. Properly sealing gaps and treating corners can significantly improve both the isolation and clarity of your recordings, especially in small, reflective spaces like closets.

Portable Recording Booth for Home Studio, Foldable Sound Isolation Vocal Shield with Floor Stand, High-Density Acoustic Blanket Enclosure for Singing, Voiceover & Podcast, Includes Phone Holder
INSTANT STUDIO-QUALITY "DRY" SOUND: Transform any noisy room into a professional vocal booth instantly. Engineered with high-density acoustic...
As an affiliate, we earn on qualifying purchases.
As an affiliate, we earn on qualifying purchases.
How Your Microphone Choice Changes Your Treatment Plan
The type of mic you use influences where and how you treat your closet. To learn more about microphone selection and treatment strategies, visit this AI industry insights site. Cardioid microphones pick up less ambient sound, so focusing treatment directly around the mic helps. Omnidirectional mics, however, catch more reflections from all directions, demanding more comprehensive treatment.
For example, if you record with a shotgun mic, you might only need to treat the space immediately behind the mic. But with a condenser or omnidirectional mic, treating side walls and ceiling becomes more critical. Picking the right mic means you can avoid over-treating or under-treating your space, saving time and money.
Deeply, this choice impacts the overall treatment strategy because different mics have different polar patterns and sensitivity levels. An understanding of your mic’s characteristics allows you to tailor your acoustic treatment to match its pickup pattern, optimizing sound quality and avoiding unnecessary treatments that won’t make a difference for your specific setup.
Common Mistakes That Ruin Your Closet Studio
One of the biggest errors is over-treating with foam everywhere. It’s tempting to cover every surface, but that can cause uneven sound and dead spots. Instead, target the reflection points and low-frequency problem areas.
Another mistake is sealing your closet completely without ventilation—this traps heat and can damage your gear. Always include some form of airflow, whether passive vents or quiet exhaust fans.
Deeply, over-treating with foam can lead to a dead-sounding environment that lacks natural liveliness, making your recordings sound unnatural or overly muffled. Conversely, neglecting proper ventilation can cause equipment overheating and humidity issues, leading to potential damage and compromised sound quality. Striking a balance between effective treatment and maintaining airflow is essential for a functional, long-term closet studio.
DIY Budget-Friendly Tricks to Make Your Closet Sound Better
You don’t need expensive gear to improve your closet sound. Use thick blankets or duvets to cover the door and walls—these absorb reflections and reduce noise leaks. Rugs on the floor help tame echoes, especially if your closet has a hard surface.
Place plush toys or pillows strategically to break up flat surfaces. Create a makeshift bass trap by stuffing a thick blanket into a corner or hanging a thick towel at reflection points. These simple steps can cut echo and low-frequency issues by half without costing a dime.
Deeply, these DIY solutions are effective because they target the fundamental issues of reflection and low-frequency buildup without requiring significant investment. They are also easily reversible if you want to experiment with your space. Properly positioning these items enhances their effectiveness, and combining them with good ventilation ensures your closet remains a comfortable, functional space for recording over the long term.
For airflow, use a small, quiet fan or passive vents to prevent heat buildup. Even a small, cheap PC fan with a duct can help keep temperatures stable in a sealed closet.
Frequently Asked Questions
Do I need acoustic foam or soundproofing materials?
Acoustic foam primarily absorbs reflections inside your closet, making recordings clearer. Soundproofing requires sealing gaps and adding mass to block outside noise. For most home setups, focus on absorption first and add sealing if outside noise is an issue.
Where should I place panels in a closet vocal booth?
Start with the wall behind your mic, side walls near your head, and the ceiling above. Use a mirror trick to find the first reflection points. Bass traps should go in the upper corners if low-end buildup occurs.
How much coverage is enough for a small closet?
Cover about 30-50% of the reflection points with panels or foam, focusing on the areas that bounce sound directly into your mic. Over-treating can cause dead spots, so prioritize the key reflection zones.
Should I treat the corners first, or the wall behind the mic?
Prioritize the wall behind your mic and the reflection points. Corners are important for low-frequency control, so add bass traps there after treating the reflection points for overall clarity.
Will foam stop outside noise, or only echo?
Foam mainly reduces echoes and internal reflections. It does little to block external noise unless combined with sealing gaps and adding mass. For outside noise, focus on sealing and barriers.
Conclusion
Remember, the best way to quiet down your closet studio isn’t just slapping foam on the walls. It’s about strategic placement, sealing leaks, and managing heat. Your rig can roar all it wants in a well-ventilated closet, while your workspace stays silent and cool. Think of your closet like a fine-tuned instrument—careful, targeted treatment makes all the difference.
Start with reflection points, seal the gaps, and move your gear into a space where noise doesn’t travel. Your recordings will sound clearer, your gear lasts longer, and your neighbors will thank you.